About Receiving Inventory Items
Acts of receiving inventory items (hereafter Acts of receiving) allow you to turn newly received inventory items on charge and document this operation. The Acts of receiving include the following information:
- stock list of received items;
- vendor name;
- purchase prices for each received item;
- a location for delivering inventory items.
After applying an Act of receiving, YumaPOS updates the stock balance for received inventory items, and adds new lot of items. If the item purchase price differs from previous price, YumaPOS recalculates the average purchase price for that item. This average price determines the prime price of this inventory item in recipes.
This topic helps you create new Act of receiving.
Create New Act of Receiving
To create new Act of receiving
- In the left pane of the Back Office Management console, click the Inventory node, and then click Inventory Transaction.
This opens Journal of documents. - On the upper menu bar, click Receiving.
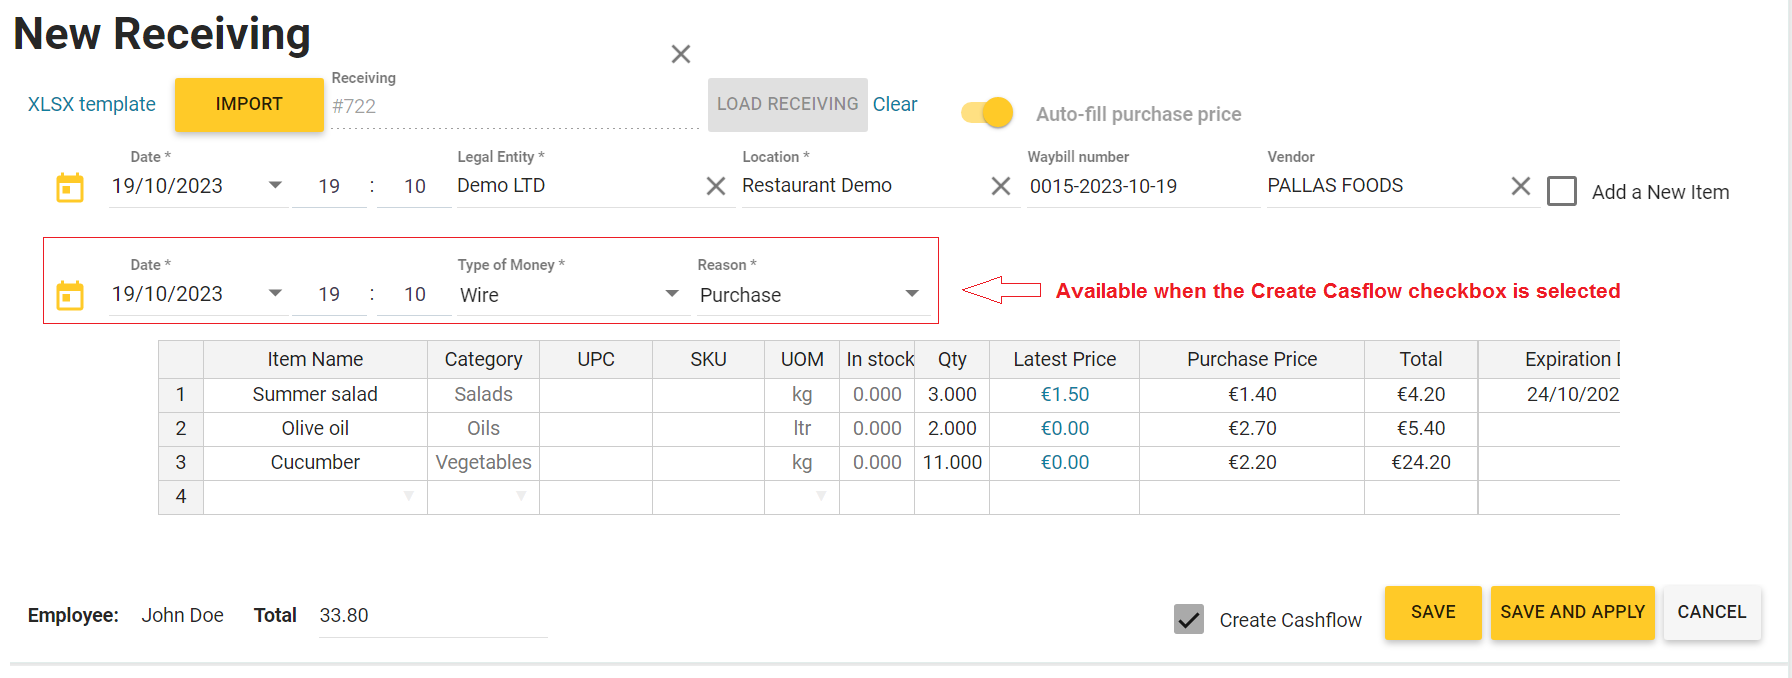
This opens the New Receiving form similar to the following screen:
- Complete this form, and then click Save (to save this Act without applying changes) or Save and Apply (to save this Act and apply changes).
Elements of the New Receiving Form
This form defines the following elements:
- Date*: specifies the act creation date and time.
- Legal entity*: lets you select your legal entity that receives this stock lot.
- Receiving: lets you select an existing Act of receiving to fill in this form with stock items from the selected Act of receiving. Select the Act of receiving, and then click Load Receiving to upload items from the selected act.
- Way-bill number: specifies the way-bill number.
- Vendor: lets you select a vendor from the list of registered vendors.
- Location: lets you select a unique location for delivering all received inventory items.
- Auto-fill purchase price: when selected, the last purchase price for the items to be purchased is loaded.
- Add a New Item: select this checkbox to add the inventory item as a new menu item.
- Import: click to fill in this New Receiving Act form with data from an XLSX file you can select.
TIP: To download the XLSX file template, click XLSX template. - Create Cashflow: select this check box to create cash flow for this receiving operation.
Important: selecting this checkbox adds the following mandatory fields to the New Receiving form:- Date: financial transaction date (current date is by default);
- Type of money: lets you select the type of the money transfer: Cash or Wire;
- Reason: lets you select a type of accounting item.
In the Act of Receiving, each inventory item has the following fields:
- Item Name*: specifies the item name.
You can select an existing item from the stock list (start typing the item name) or add new item. - Category: specifies a category to which the inventory item belongs.
Note that the category should be created before adding the inventory item (for more information, see Categories of Inventory Items). - UPC (universal product code): specifies the item UPC.
- SKU (stock keeping unit): specifies the item SKU.
- UOM*: specifies a unit of measurement for this inventory item (such as kg, pcs, etc.)
- In stock: specifies the quantity of this inventory item registered in stock (if any).
- Last Price: specifies the purchase price of the most recent lot of this inventory item (if any).
- Purchase Price*: specifies the purchase price per a unit of item.
- Qty*: specifies an amount of item (in UOM).
- Total: displays the total price of this lot.
- Expiration Date: specifies the expiration date for this item.
NOTE: Mandatory fields are marked with asterisk (*).