Before starting the sales process, enter detailed registration information about all your stores.
This topic explains how to register your stores and specify mandatory and additional information on each store.
Mandatory Registration Information
To add new store
- Open your company Back Office.
- In the left navigation pane, expand the Settings node, and then click Stores.
- Click Add, complete the Add Store form, and then click Save:


Some Notes about the Add Store Form
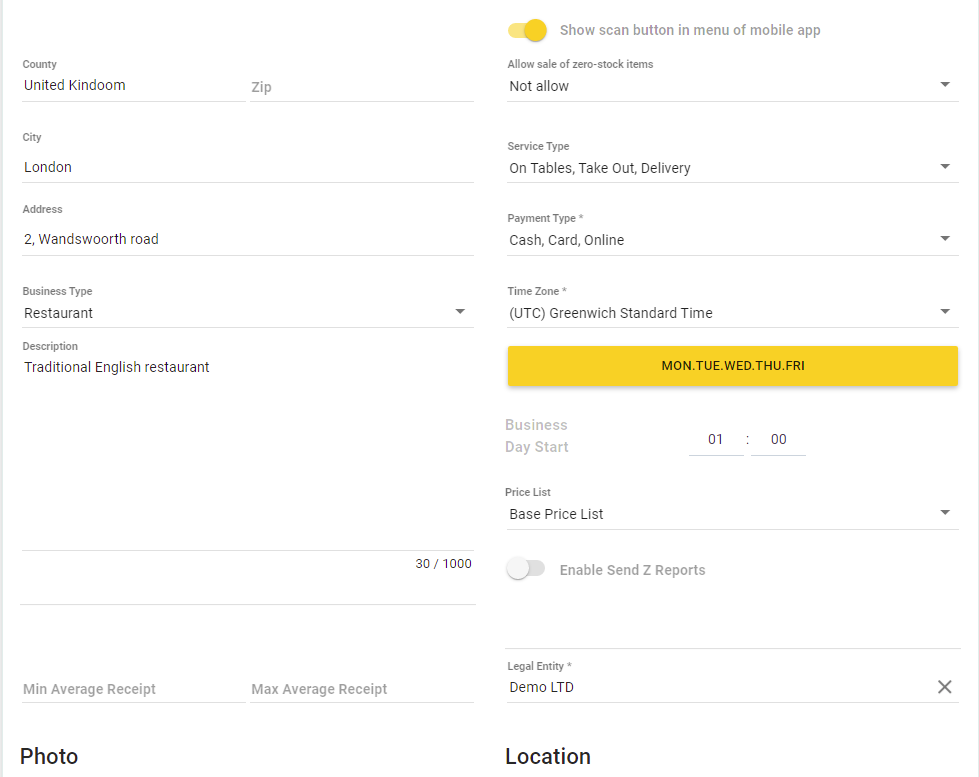
The Add Store form allows you to specify base information about your store.
- Each store is linked to al least one location for storing inventory items. You can specify a location in the Location field.
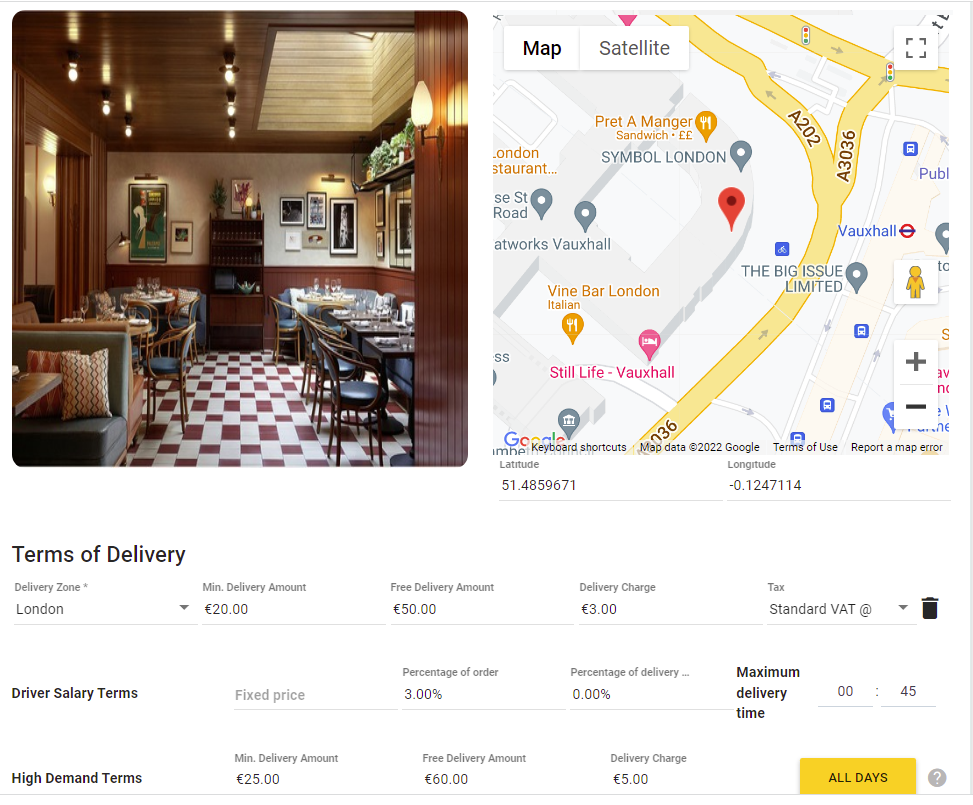
If you leave the Location field empty, YumaPOS automatically creates new location and links it to the store. The location name is set to the store name. - After entering the store address, YumaPOS automatically detects the geographical location of the store, and displays it on Google Maps.
Important: when you enter the store address information, ensure that you correctly specify the store region. You can select an appropriate region from the preliminary created Region list. For more information, see the “Regions” section in Advanced Parameters of Stores. - You can add up to six high resolution photos of your store. To add a photo, click
 and follow the provided onscreen instructions.
 - Pay a particular attention to the group of the toggle buttons under Store Settings:
- Active: Specifies whether you can manage the store with Back Office Management console (Default value: On).
- Ask Party Size*: When enabled, Mobile app or the store web site prompts the customers to set the number of guests for delivery orders.
- Ask for Cash Change*: When enabled, allows you to set the denomination of notes the customer will use to pay their order. This information helps your employees prepare notes to give change for big bills.
- Is mobile tips enabled: Specifies whether your customers can pay tips when making orders through their Mobile applications or the store web site (Default value: On).
- Promo on the Mobile Menu: when ON (enabled), Mobile apps displays advertising images of Promotional campaigns. If you disable this setting, Mobile apps does not displays those images, but Promotional campaigns are still available for customers.
- Show date and time control in menu of mobile apps: when enabled, YumaPOS displays the date and time in the Mobile apps menu.
Tip: Use this setting for stores where the menu depends on the time or week days. - Prohibit order creation from customer: enable this setting to prevent customers from making orders using the store site or Mobile apps.
- Enable Table Reservation: when enabled, the customers can reserve tables.
NOTE: The reserve time is specified in the system settings. - Enable of subcategories on customer app: enable this setting to cause the store site or Mobile apps to display sub-categories of the menu parent categories (if they have been specified).
*NOTE: These settings apply only to delivery orders.
- High demand: enable this setting to apply a special delivery mode used during the high demand period.
NOTE: In this mode, for each delivery zone, you can set special values of the delivery terms (such as the Minimum delivery amount, Delivery charge, and other). For more information, see How to Set the Order Delivery Charges. - Apple Pay enabled: nable this setting to enable the use of Apple Pay.
- Enable only scan item mode: This setting applies only to Mobile app.
When enabled, the customers can choose menu items, scan them, and then pay their order using Mobile app.
When disabled but the Show scan button in menu of mobile app is enabled, YUMA-POS redirects a customer to the store menu just after scaning a refrigerator. The store menu includes an icon for scanning menu items. - Show scan button in menu of mobile app: when this setting is enabled, the store menu includes an icon for scanning menu items. Clicking that icon redirects customers to a screen designed for scanning menu items.
IMPORTANT: The customers can scan only menu items with specified Universal Produc Code (UPC) and Stock Keeping Unit (SKU). For details, see Managing Inventory Items. - Click the yellow bar to set the store opening hours and the load control tables:
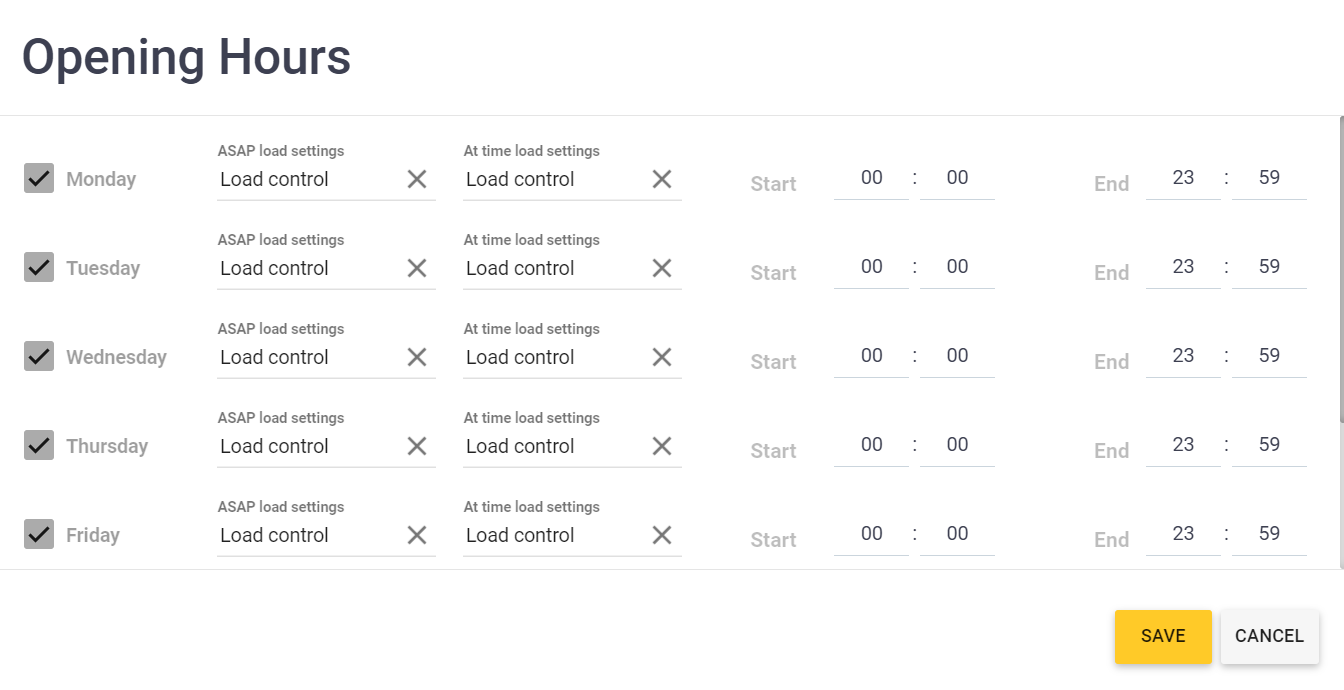
Note: For optimization of the orders processing, you should select the preliminary created load control tables in both ASAP load settings and At time load settings columns of the Opening Hours dialog. For more information, see Time Slots. - Business type: from this list, select the type of your store, such Bar, Restaurant, or other type.
- Payment type: select the payment types that are supported in your store. The following options are available: Cash, Card, and Online.
- Service type: select the type of orders that are supported in your store. The following options are available: On Tables, Take Out, and Delivery.
- Specify appropriate values in Time Zone and Business Day Start. For more information, see Business Day Settings later in this topic.
- Optionally, to cause Back Office to send Z-reports after ending shift at any POS terminal, turn on the Enable Send Z Reports toggle button, and then specify Email addresses where to send Z-reports.
NOTE: To specify several addresses, after entering each address, press ENTER.
Business Day Settings
To ensure that Back Office generates correct reports on key business data and marketing activities, we recommend you to observe the following rules:
- From the Time Zones list, select the correct time zone for your store. This information is important, especially if you have several stores located in different time zones.
- If your store closes before midnight (12:00 a.m.), set the Business Day Start value to 12:00 AM. This ensures that all reports will provide correct information for any specified date.
- If your store closes after midnight or works 24/7, set the Business Day Start value to the store closing hour or the shift end hour. For example, if your store closes at 02:00 AM., set the Business Day Start value to 02:00 AM. In this scenario, in YumaPOS reports, all transactions and sales performed from the midnight to 02:00 AM. will belong to a previous date. For example, the reports consider an order processed on December, 20, at 01:15 AM as if it were processed on December, 19.
Legal Entity Settings
To ensure that Back Office generates correct information on balances of all your stores and legal entities, for each store, select a legal entity from the Legal Entity list.
NOTE Some of your store information (such as address, photos, geographical location or the store opening hours) is visible for customers that use their Mobile applications or your web site. Ensure that this information is correct.
Additional Registration Information
The Add Store form allows you to configure only basic settings of your store. To manage your store with YumaPOS solution, configure the advanced settings. For more information, see Advanced Parameters of the Store.
See also
- Watch our help video about the store registration: