This topic helps you manage storage areas (locations for storage of inventory items). When you create new storage area, it should be linked to certain store. However, this setting can be changed if necessary.
NOTE: In this topic, the storage areas are referred to as “locations.”
View a List of Locations
To view a list of available locations
- In the left pane of Back Office Management console, expand the Inventory node and click Storage Areas.
This displays a list of available locations similar to the following screen:
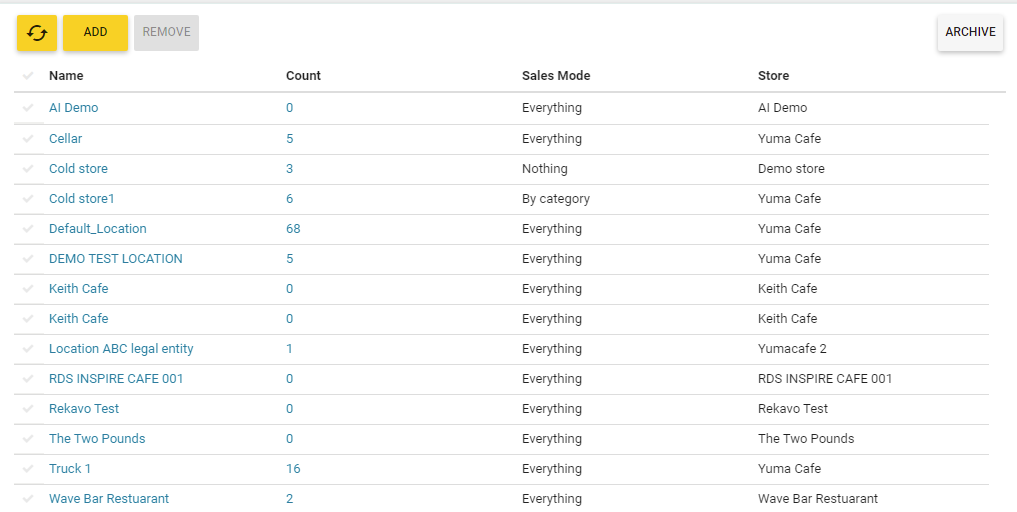
In this list, each item has the following fields:
- Name: the location name.
- Count: the number of inventory items stocked in this location.
- Sales mode: specifies the sales mode for this store. Supported modes:
- Everything: In this mode, all sold inventory items are written off.
- By category: In this mode, YumaPos writes off only inventory items that belong to specified categories.
- Nothing: In this mode, YumaPOS never writes off the sold inventory items.
- Store: the name of store to which this location is linked.
Operations with Locations
On this screen, you can perform the following operations:
- View and modify the location characteristics.
- View a list of inventory items stocked in the location.
- Add new location.
- Remove location(s) from the list.
View or Modify Location Characteristics
To view or modify the location characteristics, in the Name column, click the location name, and view or optionally change the location name, associated store, and sales mode on the form that opens.
View a List of Inventory Items Stocked into Location
To view a list of inventory items stocked into this location, click the inventory items number in the Count column. This opens the inventory items list similar to the list described in Managing Inventory Items.
Add New Location
To add new location
- On the screen with the list of available locations, click Add.
- Complete the Add Location form (specify a location name and link the location to an existing store), and then click Save:

Remove Location(s)
To remove one or several locations
- From the available locations list, select location(s) to remove, and the click Delete.
- When prompted, confirm the deletion operation.
NOTE: You cannot delete a location with non-zero amount of inventory items. In this scenario, before deleting the location, write-off all inventory items stocked into that location. For detailed instructions, see “Writing-off Inventory Items” in Adding and Writing-off Inventory Items.