This topic helps you configure the export and import of menu items from an XLSX file to menu.
Importing Menu Items from File
Before importing menu items, you should save them into a dedicated Excel (.xlsx) file.
Sample file with items to import:

To download the file template, follow instructions later in this topic.
Download Template for File with Items to Import
To download the template, perform the following steps:
- In the left pane of Back Office Management console, expand the Items List node, and then click Items List.
- On the top of the items list, click Import.
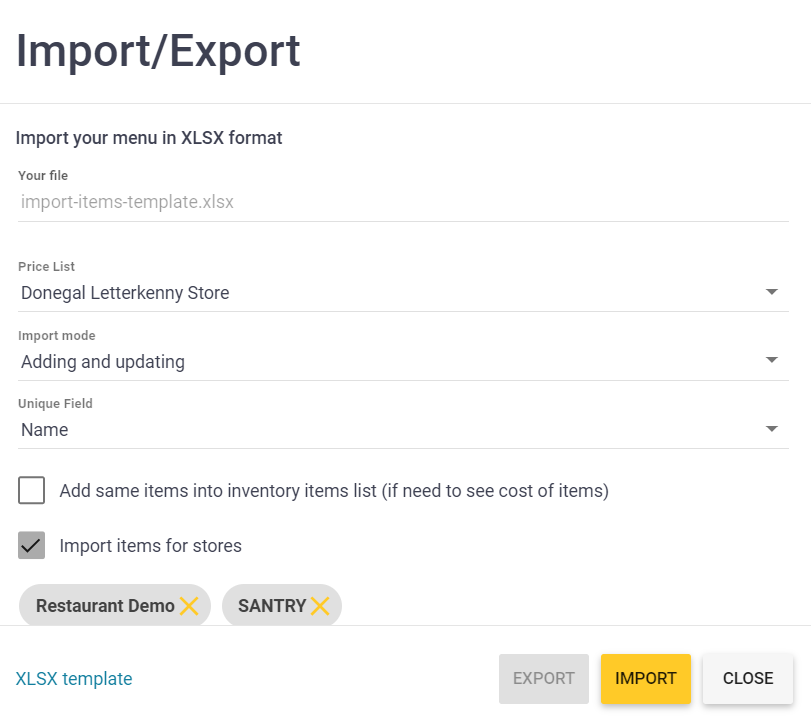
This opens the Import/Export dialog box:
- In the lower left corner of the dialog, click XLSX template.
NOTE: By default, the system downloads a file with a template named
import-items-template.xlsx
How to Fill in the Template for Importing Menu Items
The template file contains multiple fields for each imported entry (menu item). The following is a minimum list of fields (columns in the template file) that must be filled in to perform the import operation correctly:
- Name: specifies the menu item name (such as, Coca Cola);
- Price: specify the menu item price;
- Description: provides the menu item description.
NOTE: This description is displayed in Mobile App and the store Web site. - Category: specifies the menu category for this menu item (for example, for Coca Cola, the category might be Cold Drinks);
- UOM: from the provided list, choose the unit of measurement for this menu item, such as ea, ltr, kg, etc.
- Item Type: from the provided list, choose the menu item type. Possible values: menu item or retail item.
Important: Once you assigned a type to menu item, you cannot change the menu item type!
Import Menu Items from File
To import menu menu items from file
- In the left pane of Back Office Management console, expand the Items List node, and then click Items List.
- On the top of the items list, click Import.
This opens the Import/Export dialog box (see the screenshot earlier in this topic). - Under Import your menu in XLSX format, specify the following parameters:
- Your file (mandatory): specifies an XLSX file with menu items to import.
- Price List: if this field is left cleared, YumaPOS adds items to the Base price list. To add items to another price list, click this field, and then choose the price list from provided list.
- Import mode: select the import mode from the provided list. Possible modes: Only adding, or Adding and updating.
- Unique field: select an item property that is considered to be the item unique parameter. Possible values: Name, UPC, SKU, or UUID.
NOTE: The system can add the only item with the same unique property. - Add same items into inventory items list : select this checkbox to cause the system to automatically add a corresponding inventory item for each importing menu item of the “Retail item” type.
- Import items for stores: to import items to specified stores, select this checkbox, and then add the stores to the Stores field.
NOTE: By default, this checkbox is cleared. In this scenario, the system imports menu items to all your registered stores.
- Click the Импорт button.
Exporting Menu Items into File
To export menu items into an Excel file
- In the left pane of Back Office Management console, expand the Items List node, and then click Items List.
- On the top of the items list, click Import.
This opens the Import/Export dialog box.
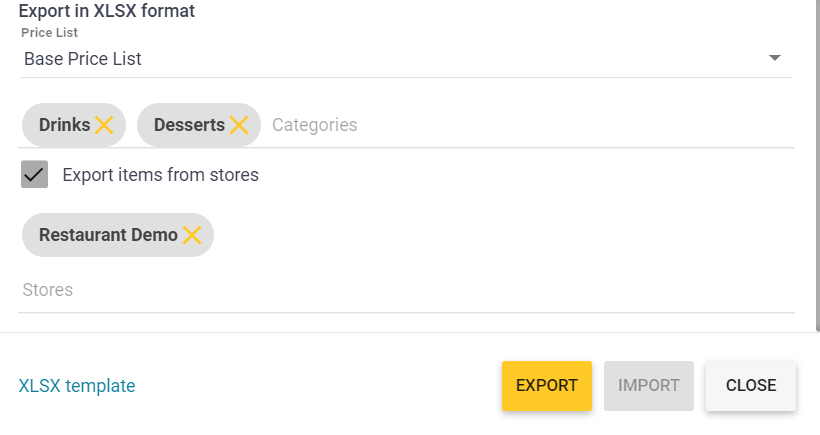
- Under Export in XLSX format, specify the following parameters:
- Price List (mandatory): from this list, choose a price list to use for setting prices of the menu items that you export.
- Categories: optionally, add categories of menu items that you export.
NOTE: If this field is cleared (default scenario), the system exports menu items of all categories. - Export items from stores: to export items from specified stores, select this checkbox, and then add the stores to the Stores field.
- NOTE: By default, this checkbox is cleared. In this scenario, the system exports menu items from all your registered stores.
- Click Export.
NOTE: The system downloads an XLSX file with exported menu items. The default file name is
All menu items <YYYY>-<MM>-<DD>.xlsx, for example: All menu items 2023-09-10.xlsx