You can specify base parameters for your store during the store registration. For more information, see Register Stores. However, an effective management of your business with YumaPOS Back Office requires that you set advanced parameters.
You can specify the store advanced parameters in the following ways:
- Set parameters under the Settings node of the Management Console
- Set parameters in the store data sheet
Parameters Specified under the Settings Node
Floor Plans
You can optionally specify floor plans of your stores.
To add a floor plan
- In the left navigation pane, expand the Settings node, and then click Floor Plans.
- Click Add.
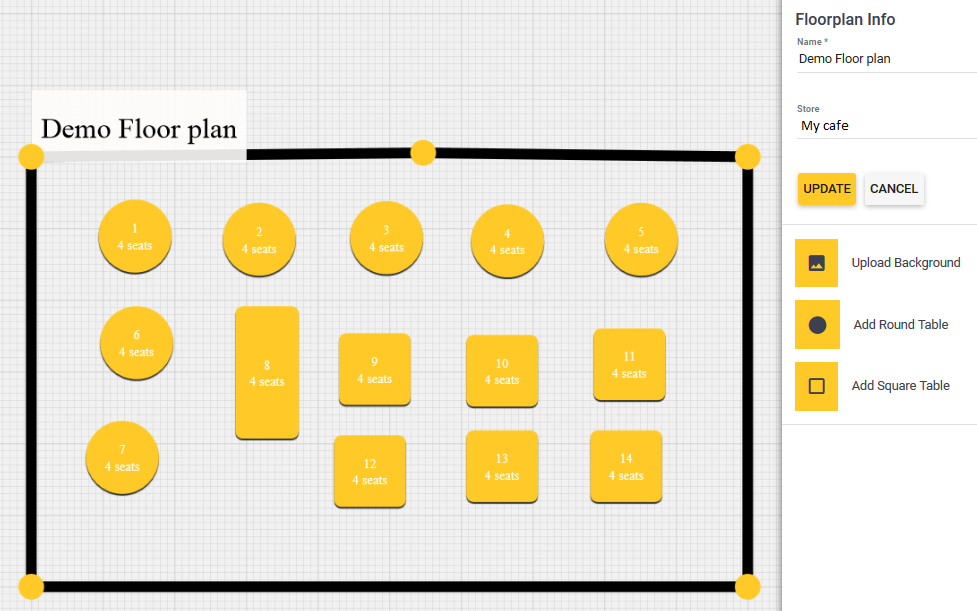
- In the Floorplan Info pane, do the following and click Save (or Update):
- Specify the plan name in the Name text box.
- Select your store from the Store list.
- Compose your plan using the Upload Background, Add Round Table, and Add Square Table buttons.
NOTE You can assign numbers to tables. POS Terminal and Customer Mobile applications can operate only with numbered tables.
Regions
For processing the orders placed using Mobile app or the store web site, you should set correctly the region of your store. Back Office lets you save a list of regions.
To create a list of regions
- In the left pane of Back Office Management console, select Settings > Regions.
- Click Add Region, complete the Add Region form, and then click Save:
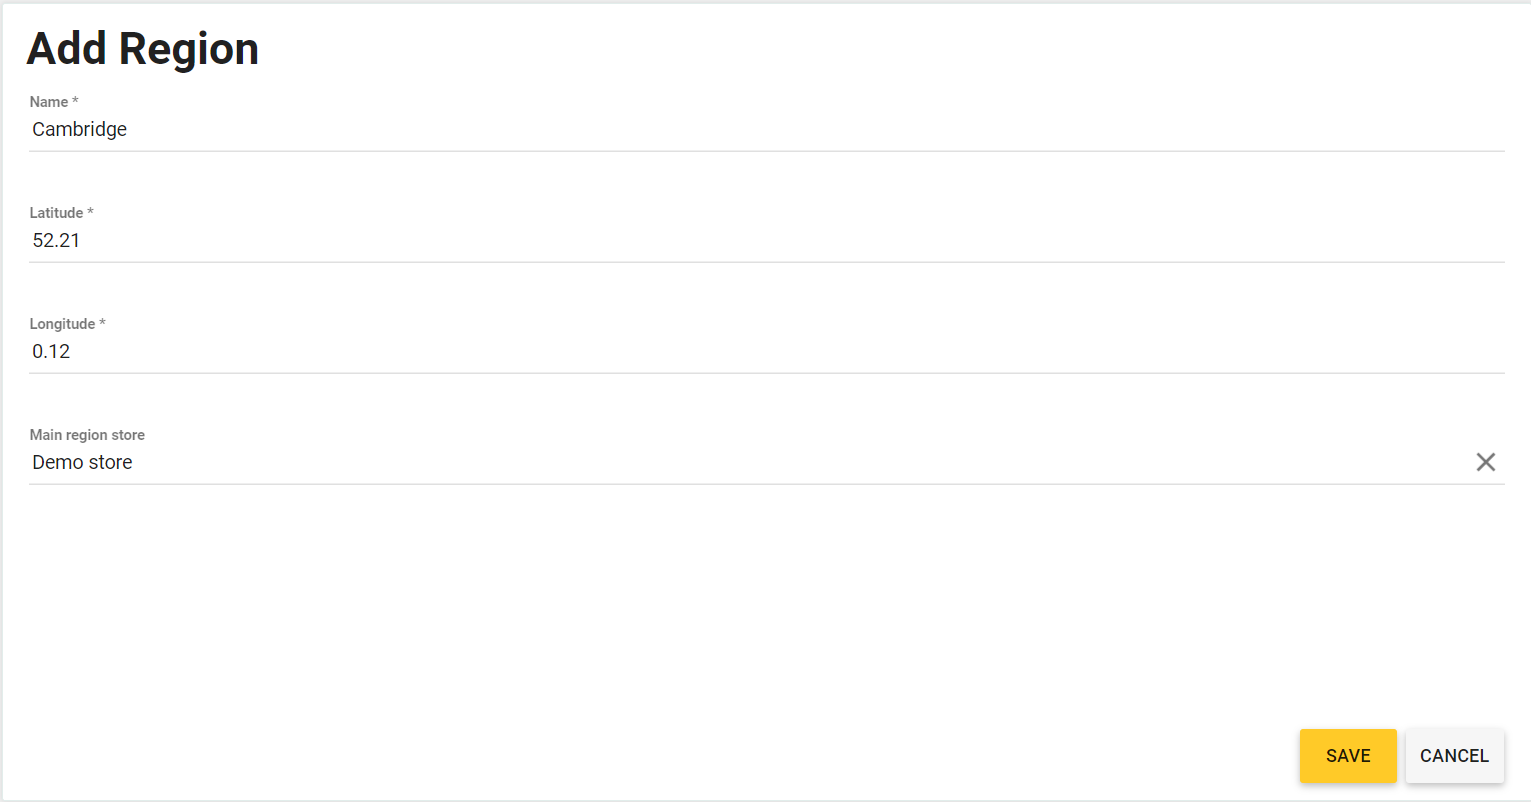
Note: It is important to set accurate values of Latitude and Longitude. For each settlement, you can find this information in Google maps or similar platforms.
To set the store region
- In the left navigation pane of the Back Office Management console, select Settings > Stores, and then click the store name.
- From the Region list, select a region:

Delivery Zones
Complete the procedures from this section only for stores with the Delivery service type. These zones define where the orders can be delivered. If a customer entered a delivery address out of zones, the order cannot be confirmed.
NOTE For each store, you can define several delivery zones. You can also register stores without specified delivery zones.
Add Delivery Zone
To add a delivery zone
- In the left navigation pane, expand the Settings node, and then click Delivery Zones.
- Specify the zone name in the Name text box.
- Select the Draw Zones option.
- On the Google map, specify a polygon that limits your delivery zone.
TIP: To specify a polygon, left-click map in the polygon vertices.
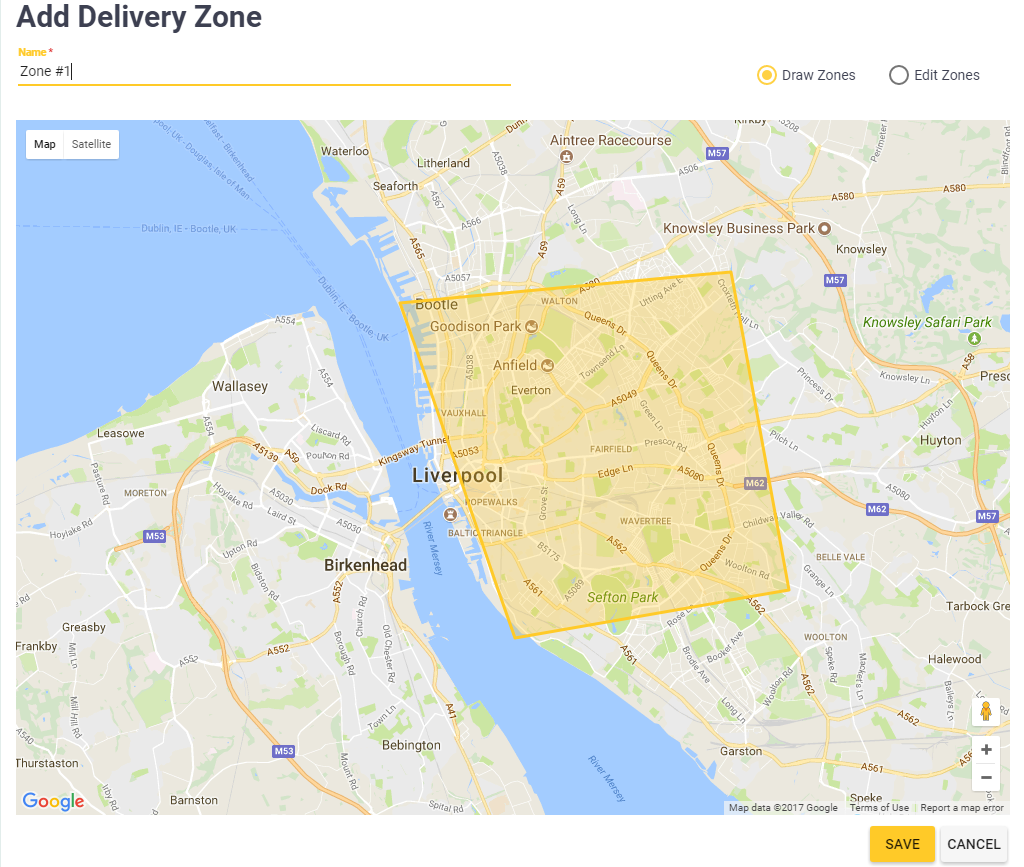
- When finished, click Save.
Specify Delivery Zones for Your Stores
After you added delivery zones, link them to your stores.
To specify delivery zones for a store
- In the left navigation pane, expand the Settings node, and then click Stores.
YumaPOS displays a list of all your registered stores. - In the list, click the store for which to specify delivery zones.
YumaPOS displays the Properties page for the selected store. - Navigate to the Terms of Delivery tab.
- Click Add Delivery Zone, select a delivery zone from the Delivery zone list, and then specify advanced parameters*:
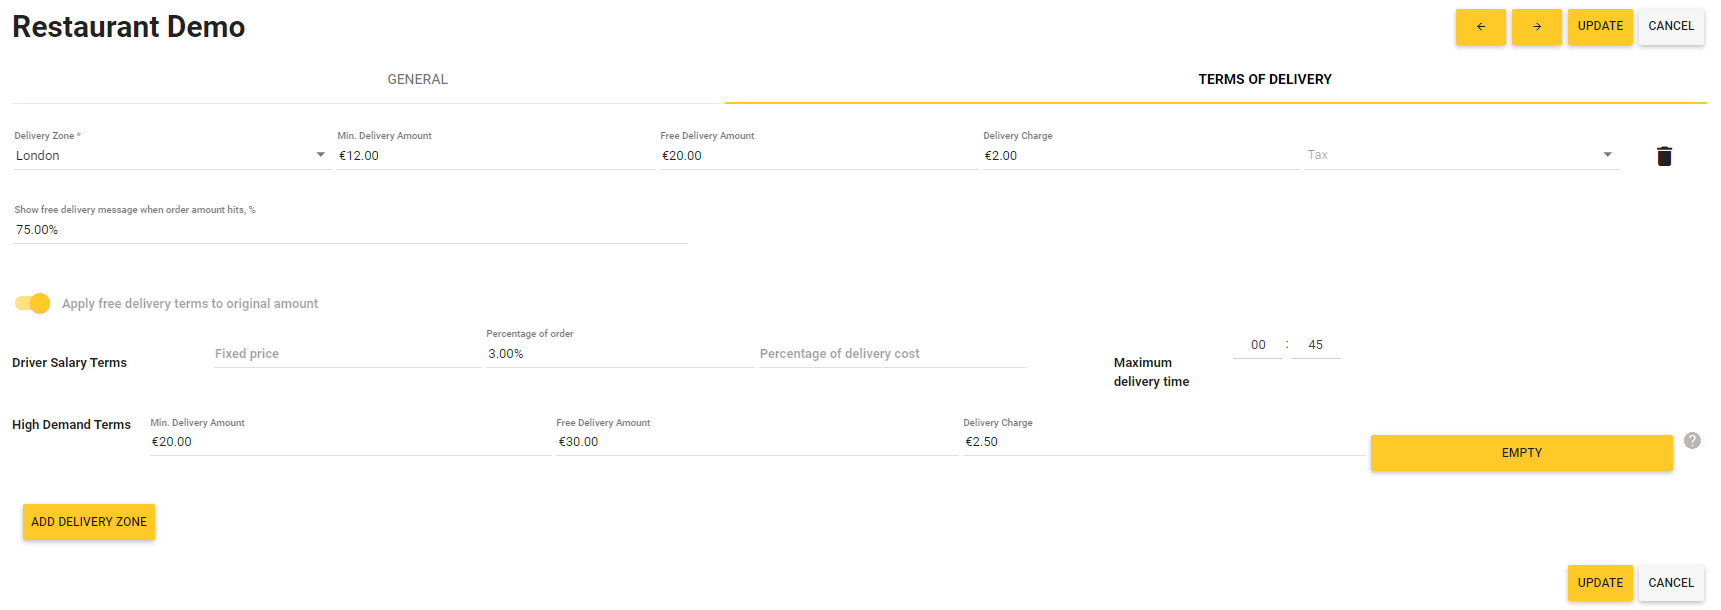
- Min. Delivery Amount: specifies a minimum order price. If the order price is less than this value, the order cannot be delivered.
- Free Delivery Amount: specifies a minimum order price for free delivery.
- Delivery Charge: specifies the delivery charges (if any).
- Tax: specifies a tax type applied to the delivery charges. You can select the tax from the preliminary created list of taxes.
- Show free delivery message when order amount hits, %: specifies when YumaPOS sends a message that informs a customer about free delivery of this order.
Example: If the free delivery amount is 20 units of currency, and you set this field to 75%, the system sends the free delivery message when the order amount reaches 15. - Apply free delivery terms to original amount: enable this setting to apply the free delivery terms to the original amount of order without accounting any discounts.
- Driver Salary Terms: This group of parameters defines how to pay the driver salary. The following options are available:
- Fixed price: sets a fixed fee per a delivered order.
- Percentage of order: sets the driver salary as specified part (in percents) of the order price.
- Percentage of delivery cost: sets the driver salary as specified part (in percents) of the order delivery fee.
- Maximum delivery time:** specifies a maximum order delivery time at a minimum load.
**NOTE: These parameters affect the order delivery time, which is displayed for customers in Mobile app or the store site. For more information, see Load Control
- High Demand: This group of parameters defines delivery terms if you enabled the High Demand setting in the store settings. For information about how to specify those parameters, see How to Set the Order Delivery Terms).
- To specify the orders delivery schedule for this zone, click the yellow rectangle Empty. Note that the orders delivery schedule for a particular delivery zone may differ from the schedule for delivery of orders specified in the store. For more information, see How to Set the Order Delivery Terms
- Repeat Step 4 for each delivery zone to link to this store.
*NOTE: For more information on how to specify the terms of delivery, see How to Set the Order Delivery Terms.
Parameters Specified After Creation of Store
After you created and registered a store, specify advanced parameters of that store in the following way:
- In the left navigation pane, expand the Settings node, and then click Stores.
Back Office displays a list of your registered stores. - In the list, click the store name.
This opens the store data sheet.
- Specify advanced parameters, and click Update.
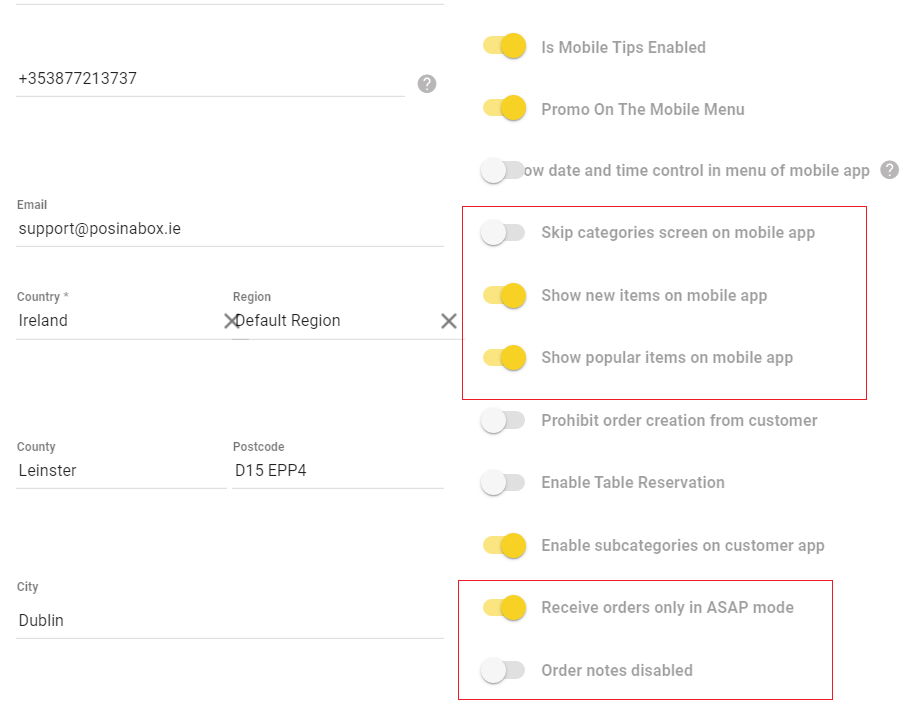
You can specify the following advanced settings (see framed parameters in the above screen):
Advanced Parameters for Orders Made Using Mobile App or Web Site
- Skip categories screen on mobile app: when enabled, Mobile app displays menu items as a list without grouping the items by categories.
- Show new items on mobile app: when enabled, Mobile app displays new menu items.
- Show popular items on mobile app : when enabled, Mobile app displays popular menu items.
- Receive orders only in ASAP mode: when enabled, the customers cannot set the desired order delivery time. Their orders are processed in the “First-in First-out” mode.
- Order notes disabled: when enabled, the customers cannot add comments to their orders made through Mobile app.
Assigning time slots for orders
You can define the days and hours when the customers can make orders of various types , such as the dine-in (on tables), delivery, or quick service (takeout) orders.
To assign time slots
- On the General tab of the store properties page, click the yellow bar:

- On the dialog that opens, use controls to specify time slots for processing the On tables, Takeout, and Delivery orders, and then click Save:
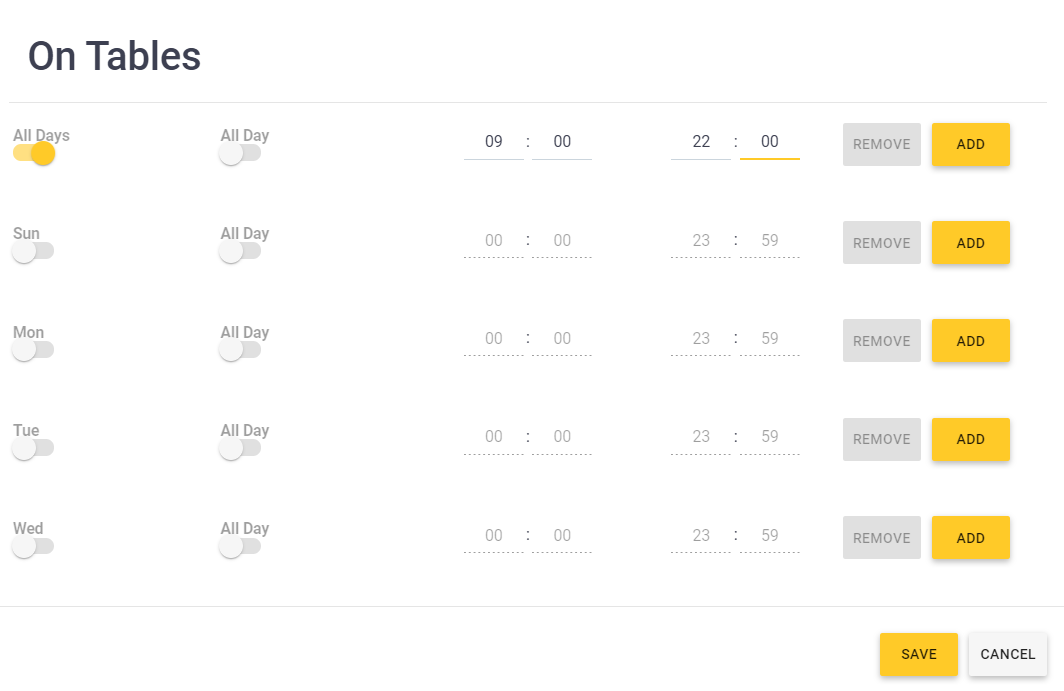
The above sample illustrates that the On Tables orders are available for customers every day from 09 to 22h.
Integration with Uber
YumaPOS allows you to integrate your stores with Uber Eats (the food delivery service). The clients of the Uber Eats platform can use Uber interface to make delivery orders in your stores.
To configure integration with Uber Eats
- In Back Office Management console, open the store data sheet (Settings > Stores > <your store name>).
- Scroll down to the Uber Eats area:

- Into the Uber Eats area, specify values of the following control elements:
- Online: turn on this setting to enable your store in the Uber Eats system.
- Price List: from this list, select a price list to apply to sales with Uber Eats.
- UberEats Store Id: in this field, enter ID of your store in Uber Eats.
Uber sent this ID to you after registration of your store. - Payment Type for your order by default: from this list, select the payment type that Uber Eats platform prompts the customers to use by default.
For information about how to create the payment types list, see Custom Types of Payment. - Export Menu to Uber: click this button to upload your store menu to the Uber platform.